![]()
Thank you for purchasing XTC Motorsports Turn Indicator
Kit. Our new Turn Indicator Kit is unique from the other kits on the market.
This kit is completely plug and play , no wires to cut, no crimping with only
power, ground and plug it into the OEM harness and lights. Like many cars on
the road today, our kit uses the factory brake lights as turn indicators. Most
other kits use one 3/4" marker light for each turn indicator. The factory
lights are many times larger, making it much safer to be seen.
Since these vehicles are used primarily for
off road use, we use a turn switch on the dash including a hazard switch,
instead of those cumbersome turn levers that break off.
This kit is completely plug and play , no wires to cut and
no crimping, with only power and grounds to hook up. The system is designed to
be installed under the dash. Do not mount the box until the wires have been run
and you have decided where you want to mount the switches. A good place for the
turn switch is on the left side of the steering wheel. Please read the instructions fully and
familiarize yourself with the components before starting the install.
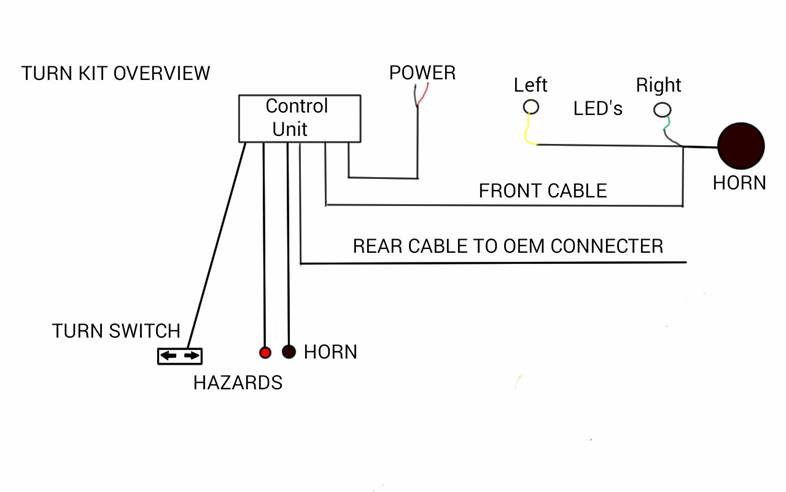
Overview:
1.
Run long harness from
under dash to rear
top of engine and remove factory rear light harness and attach new harness to OEM
connecter and lights
2.
Run short harness to front left and right, drill ¾” holes
in front, mount and connect left and right turn lights
3.
Cut and mount turn switch
4.
Drill
3/4" holes
for the Hazard Switch and Horn Switch, mount and reconnect. The Hazard switch
is wired Black to top gold pin, Blue to center and Brown to bottom.
5.
Run power wire with fuse to 12vdc and ground.
6.
Verify operation
Details
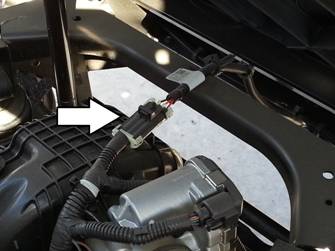
1.
Remove the hood and dash cover. Run the long
harness
from inside the dash through the
fire wall to the rear light harness connector above the engine at rear, see
photo. The bottom center skid plates are removable so the cable can be run.
Be sure to keep
harness away from any hot or moving parts.
2.
Remove both tail lights, unplug and remove the
rear light harness from over the engine into the box corners.
Note: to remove connector lift up on top loop and pull
connector out.
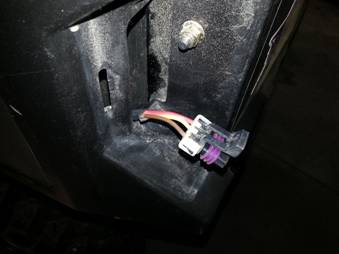
3.
Plug new harness in to factory connector and finish running
the new harness
to the right (green) and
left (yellow) lights and plug into each light and re-install lights. We have provided
a Red and Brown power wire for an optional license plate light.
4.
Remove the two front LED's from the harness and run through
the fire wall to the Left (yellow) and the right (green) front.
5.
Drill a ¾” holes in front left and right corners
to mount the front left and right turn lights, remove the rubber grommet from
the light and install in hole then reinsert light into grommet. Use caution when drilling making sure there
is proper clearance on the inside

6.
Plug front turn lights into connectors on front cable
(Note:
Black wire on LED light is
positive and goes to the Green and Yellow wires)
7.
Mount the horn in suitable place and attach the purple wire
and the supplied ground wire to it, make sure the black wire gets to a proper
metal ground or it will not work.
8.
Pick a suitable place to mount the turn switch.
Make sure there is proper clearance behind
the dash . Using the switch housing as a template, cut the switch opening
and insert housing, run switch cable through the housing and attach the plug to
the switch, then slide the switch into the housing
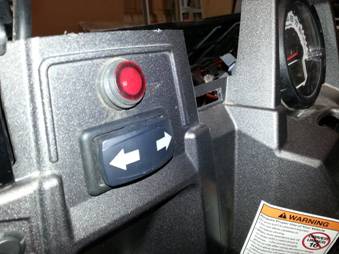
9.
Drill
two ¾” holes
for the hazard switch and horn, mount and reconnect. Make sure there is proper clearance behind the dash for the switches
10.
Run power wire with the fuse to 12vdc and the other wire to
ground
11.
Mount control box with 2 self tapping screws provided.
12.
Verify operation of all lights
13.
Verify that all cables and wires are secure with cable ties
and be sure to keep harness away from any hot or
moving parts. Extra cable harness can be bundled under dash or in the
rear with cable ties.
14.
Re install skid
plates, dash cover and hood.
Trouble Shooting Guide
No Lights come on and horn does not work - Verify that the
wire with the fuse has been attached to power and the other wire is grounded,
check fuse
Front lights do not blink but rear does - Verify correct
front wiring, black wire on the LED's are positive and go to the green and
yellow wires, white wires go to the white wires
Turn Indicators blink but no brake light - Verify the rear
harness was plugged into the factory connector and the key is on.
For support on installation we can be emailed at
support@xtcmotorsports.net or we can
be reached by phone at 480-558-8588 Hours: Monday thru Friday 8:30am to 5:30 pm
MST, Saturday 9am to 2PM MST Closed on Sundays
XTC
Motorsports LLC 925 N. McQueen Rd. Suite 101 Gilbert, AZ 85233
*Disclaimer: This kit is intended for off road use only
and
XTC Motorsports claims no
responsibility for its use. It is up to the purchaser to make sure it complies
with all Federal, State and Local laws.
Copyright2015 XTC MOTORSPORTS LLC All Rights Reserved